Welcome To This Jenn Girl

Today is the day that I make the official move from Polished PR to This Jenn Girl! I cannot even begin to fully express how excited I am to go on this new journey with you. Although it is slightly bittersweet to be leaving WordPress, I am so thrilled to be making this big move, and I hope that you will join me!

Welcome to This Jenn Girl_Title

Celebrating 5,000+ Facebook Fans, With A Re-Brand

Over the weekend, thanks to another #sharethelove movement, Polished PR reached over 5,000 fans! I am so thrilled, and thought this would be the perfect time to reveal some big news to you. Not only will I be leaving my .wordpress.com blog for a domain of my very own, but Polished PR will also be re-branding to This Jenn Girl!

Here’s a little back story regarding that name, and why it is the handle for all of my social media platforms: When I began college and started introducing myself as Jenn to people (I always went by Jennifer when I was younger), everyone would refer to me as ‘this Jenn girl’ in every imaginable context. When I started my first job as a hostess at a local restaurant: “This Jenn girl just started training today.” When I started getting into nail art and my peers found out about it: “This Jenn girl does really cool nail designs, you should check out her blog.” Even when I started at the agency I’m currently working at, it was “This Jenn girl” this and “This Jenn girl” that. I never bothered getting offended by the fact that I was being referred to so casually and informally– in fact, I embraced it, by using the phrase for all my social media handles.

And so, I am embracing the name once again, through this re-brand. This Jenn Girl will be a lifestyle blog with a main focus on nail art, but will also include posts that delve into career advice, fashion trends, beauty tips and more. Think of it as that corner café where you can unwind over your favorite cup of coffee.

I want to take the time to thank you for your support throughout the Polished PR journey– I hope you’ll join me on this next adventure! The new blog will be launched at the end of the month, so stay tuned!

Post Title-01

Floral Decals From Born Pretty

*Disclosure: One of the products featured in this post was provided by the manufacturer for review.

During the time that Alice, from the Born Pretty Store, reached out to me in regards to writing up a product review, another item that caught my eye was this set of flower-patterned water decals. They looked perfect for springtime and I thought they’d pair nicely with a soft blue polish.

I applied two coats of Bam-Blue-Zled from Ulta onto each nail, minus the ring finger, where I instead used two thin coats of Indigo Night from Revlon Colorstay. Once the coats dried completely, I began to apply the water decals onto the lighter blue polish. The application process was extremely easy– I simply cut out the decals that I wanted to use, placed the decal face-down on the nail, and then placed a cotton ball soaked in water over it. After about ten seconds, I removed the cotton ball and the decal to reveal a perfectly placed floral transfer on each nail. I then applied one generous coat of Adrienne from Shimmer Polish onto the accent nail, and finished the manicure by applying a single coat of INM Out The Door top coat to each nail.

photo 1

photo 4 (1)

photo 3 (1)

photo 2 (1)

photo 5 (1)

This is one of the rare times that a manicure turns out just as I imagined it would! You can take a look at the other items that the Born Pretty Store offers nail artists on its New Arrivals and Most Popular pages. If it’s your first time shopping, you can use my code FLX31 at checkout for 10% off your order.

I’m excited to officially announce my return to the blog :) I’ve got a lot of fun swatches and nail designs lined up for you, so be on the lookout!

L’Oreal Extraordinaire Gel-Lacque In ‘Don’t Shy Away’

Last weekend, I went to my local CVS and came across a display for L’oreal’s Extraordinaire Gel-Lacque 1-2-3 system. I’m not normally an impulse buyer when it comes to items like this, but when I saw the description ‘Perfectly shaped and volumized nails. Rich, ultra glossy color.’ without a need for a UV lamp, I could see how someone might get sucked in.

So, I bought the system; a box containing the Step 1 Primer and Step 3 Glaze for $12.99 and a bottle of the Step 2 Color in Don’t Shy Away, a creamy navy blue, for $7.99. The application was easy enough: one coat of primer, followed with two coats of color, and finally a coat of glaze to finish the mani.

photo 4


photo 3

photo 2

photo 5

Post-application, the mani looked extremely glossy, just as the box described. However, there was no mention of length of wear anywhere on the box or bottles. The mani stayed put for about three days until I started to notice wear along the tips of my nails. The shine also dulled significantly after three days. I was able to wear them for a little bit less than five days before my minor OCD kicked in and I had to remove the polish. The consensus? I’d rather spend $5 on a bottle of INM Out The Door, use that as a top coat for any polish of my choice, and have it last for a week, than spend $19.99 on a system that made my mani last for five days.

I, unfortunately, do not have any day-by-day photos for you :( Because I’m out of the house all day because of work, it’s so difficult to get the right lighting for my pictures like I used to. Which means, it’s time to build a light box! If you have any tips or tricks for me in regards to building one, I’d love some suggestions!

Guest Post: The Lifespan Of Makeup

The Lifespan of Makeup Title-01

It seems like every beauty article I’ve read lately is telling me when I need to dispose of my makeup. The problem for me, as with a lot of bloggers, is that we have a lot of makeup and some of it only makes it out of storage for the most special of special occasions. So, I thought it might be useful to explain what the makeup expiration time limits these articles give us are based on, the risks you run by using your products past these dates, and how can you extend the life of your products.

The first risk is of bacterial contamination. Bacteria loves to grow in warm, moist environments, so the biggest risks are in moist products (gels, liquids, tints or creams) that we use on moist areas (eyes and lips). The big offenders here are mascara, liquid eyeliner pens, lipsticks and lip glosses. Next up, are facial products, especially any that are touched repeatedly with fingers or swiped on the face. To minimise the risks and extend life on these products, here are a few easy tips: 

  • Make sure and store these in a non-warm/non-moist environment (Keep these stored out of the shower area!);
  • Keep the lid on tightly when not in use to minimise airborne contaminants;
  • Try to not touch the applicators, but drip the products onto an applicator that you can clean separately (like a brush);
  • For products like gel eyeliners, use an applicator that can be cleaned and sterilised;
  • For very rarely used items, you can sterilise them with rubbing alcohol after each use to minimise germs;
  • Wash your hands before using any products where you have to touch the container.

The second risk is that the active ingredients can lose effectiveness or the formula can become less stable. This why you get suggestions like throwing out nail polish after a year (as if!). Powder-based pigments fall into this category, as do lotions, blush, brow pencils, fragrances and so on. It’s worth noting here that sunscreens (SPF) are particularly prone to expire so make sure to double up and not rely on the SPF given on an old product. This is one of the most common triggers of an expiry/PAO (period-after-opening). The risks associated can range from the product becoming less vibrant, the product separating or the product simply changing texture or fragrance; but if the active ingredients have changed, you may be more prone to skin irritation in some cases.  To minimise the risks and extend life on these products here are a few easy tips:

  • Keep out of direct sunlight as this will encourage degradation;
  • Keep the lid on tightly when not in use to minimise the product drying out or losing texture;
  • Temperature control will help these products maintain stability (Again, not stored in the shower area!);
  • If you suddenly discover old eyeshadow or blush that you want to start using again, try testing the product on the back of your hand to test whether the product will irritate your skin, before swiping it across the face and potentially having a very bad reaction.

Essentially, most products are designed to last as long as it would reasonably take you to use them up and are tested presuming the worst about how you will store your makeup. With care, you can extend the life even further that suggested with really very little risk to your health.


About the Contributor

IMG_2997

Rebecca is an Australian beauty blogger with a passion for data organizing! She has an extensive makeup collection (mainly nail polish), with a personal blog at lastcontrast.wordpress.com. She has 3 kids and 3 cats and keeps very busy on both fronts. She enjoys puns and silly jokes, and is always aiming to be more organized around the house, but is never as successful as she planned. She has a makeup organizing app on Apple and Android available via www.mymakeupcollection.com

Guest Post: Just For Me Mani (Plus, An Interview Tip!)

Hi everyone!! My name is Jacqui and I run a U.S. nail art blog called craftynail.com.  I’m very happy to guest post for Polished PR today!  After all, I’ve been reading Jenn’s blog since, well, since we both started blogging!  I love that Jenn throws in little tips on career building.  I moonlight as a nail blogger, but I work as an advisor at a university for my day job.  So education and career planning is in the forefront of my mind as well.  If you read through to the end of my post I will have a bonus job interviewing tip for you!  But let’s see my nails first…

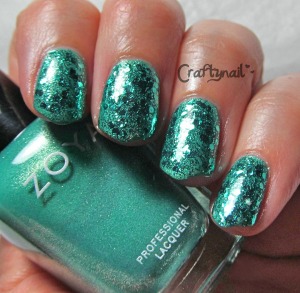
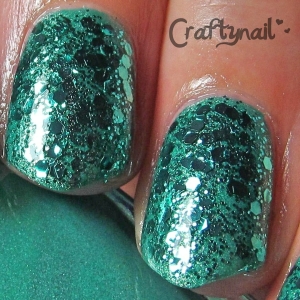
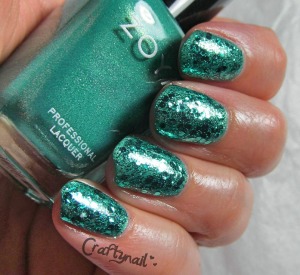
As a blogger, I often find myself doing my nails specifically for a nail art challenge, or to review a new product I received. But what’s different about this manicure is that I did it JUST FOR ME! It’s not often enough that I get to do a manicure just because I feel like it! I used two polishes that have been calling to me saying, “Jacqui, you love me, why don’t you wear me?  You keep thinking about me, but I’m still sitting here on this shelf!” Those two talking polishes are Zoya Zuza (my base color) and Sinful Colors Lush Life (glitter topper).

Being this glitter-tastic didn’t come easy though! You won’t believe how many coats of polish I’m wearing here. I applied one coat of Essence peel-off base coat, two coats of Zoya Zuza to give me a nice teal base color, 5 coats of my Sinful Colors teal glitter, and one coat of Seche Vite topcoat.  That is a total of 9 coats!  I didn’t expect needing that many, but I wanted it to be super glittery and my Lush Life glitter was more sparse than I expected.  Oh well.  No one said being beautiful was easy!

teal_glitter_nails

teal_glitter_closeup

zoya_zuza_glitter

Now for my job interviewing tip!  I interview students from time to time when my office needs a new student worker or intern.  I have also been on the other side, as an interviewee, since I have had many career changes since I graduated from college.  I’ve landed some jobs that I had no experience in at all.  I’d like to think that a lot of my success hinged on my interviewing skills.  Specifically, my enthusiasm and honesty.  What do I mean by that?  If I’m interviewing for a job and I’m really psyched about it, I make sure to tell the interviewer!  You should come right out and tell them exactly why you think you are perfect for the job and that you’re really excited about the opportunity.  Be honest with them.  If you’re thinking it’s a perfect fit for you, then tell them that!  If they don’t ask you questions that allow you to express this stuff, then make sure to bring it up before you leave the interview.

When I’m saying my goodbyes I like to stand up, shake their hand nice and firm and tell them how excited I am because of x, y and z. Look them straight in the eyes and be honest and enthusiastic.  You want to end the interview with a bang so you stand out from the bunch.  Why would they want to hire someone who just comes in, sits down and answers their questions like a drone when they could hire YOU!

I must admit, I always get so nervous before I interview!  I can’t tell you how to handle that, since I haven’t found a solution for that yet.  LOL!  But none the less, I hope my little interviewing tip is helpful for you.  Thanks to Jenn for having me!  And if you want to see more of my Craftynail style, find me online!  Here’s where I’ll be hanging out– facebookpinteresttwittertumblr, and bloglovin. 


 About the Contributor:

july7th

Jacqui lives in the Hudson Valley of New York State, where she works at a university as a financial aid counselor. When the daily grind of student loans comes to an end, she can be found hibernating at home while whipping up some cool craftiness. The main focus of her blog, Craftynail, is on nail care, nail polish and cute nail designs.

Feeling French

*Disclosure: One of the products featured in this post was provided by the manufacturer for review.

Alice, from the Born Pretty Store, reached out to me a couple of weeks ago requesting reviews of a couple of the website’s products. One of the items that caught my eye was a set of ‘Nostalgic Eiffel Tower’ nail art decals— I thought the decals would make for the perfect accent nails.

It was definitely one of my better ideas! I chose my ring finger and thumb to use as the accent nails and applied two coats of Simply Sizzling from Rimmel London’s Salon Pro line on the other three nails. After the polish dried completely, I chose the decal sizes that best fit my thumb and ring finger– both sizes fit perfectly, so there was no trimming needed. The application process was super simple– I applied the decal to the bottom of the nail first, then smoothed it out toward the tip of the nail. Then, I pulled the decal gently over the tip of the nail and quickly filed off the excess. I sealed in the manicure with two coats of INM Out The Door top coat.

photo 1


photo 5

photo 4

photo 3

photo 2

love how this mani turned out! I’m so excited to use the leftover decals for future uses– I’d love to pair them with an espresso brown polish :) You can take a look at what else the Born Pretty Store offers nail artists on its new arrivals and most popular pages. If it’s your first time shopping, you can use my code FLX31 at checkout for 10% off your order.

I’ll be on hiatus for a bit, checking in here and there, but will have guest bloggers freshening up the content with beauty, fashion and career tips for your reading pleasure!


Hello, April.

Happy first day of April! It’s going to be a crazy, busy month for me, but while I’m sharing some guest posts with you, I’ll be building up some nail art inspiration just in time to share with you come May :)

Polished PR recently reached 4,000 fans on Facebook and I couldn’t be more thrilled! I’m just amazed– it was only recently that I held my 2K giveaway and I’ve already doubled that milestone, all thanks to the #sharethelove movement. Thank you, for supporting me in this journey. I really could not be where I am today without you! Next milestone: 5,000 fans– I’ll be hosting my next giveaway then!

With that, I will leave you with this whimsical, spring-themed design. I incorporated this year’s Pantone Color of the Year, Radiant Orchid, adorned with fun and bright daisies. For the base color, I used two coats of Sweet Tooth from Sinful Colors. Using a flat brush and a white polish (I used Snow Me White from Sinful Colors), I painted on five white petals and finished each daisy with a dot of yellow (Unicorn from Sinful Colors) in the center. For the accent nail, I applied a single coat of Tazmanian Devil from Confetti over two coats of Sweet Tooth.

photo 1


photo 4


photo 2


photo 3


I hope you have a lovely day, sans any April Fools’ Day jokes ;) Until next time! xo


‘Pretty & Preppy’ Nail Art Kit From Shine & Sheen

*Disclosure: The product featured in this post was provided by the manufacturer for review.

Early in my nail art blogging ventures, I connected with Christina of Shine & Sheen, a colorful nail art blog filled to the brim with endless creativity. She was the contributor of my very first guest post on Polished PR and since then, we’ve supported one another in our contributions to the nail art community. While I stuck to the swatching, designing and blogging, Christina headed in an entrepreneurial direction with Shine & Sheen, and has launched a line of concept nail art kits!

I was SO excited when she asked if I would review one of her kits– even if I hadn’t connected with her before, the fabulous idea of concept nail art kits tailored to a certain style/personality is one that would have drawn me in immediately! I chose to be sent the Pretty & Preppy nail art kit; on the cover is Amanda, “a preppy, girly & classic Blair Waldorf”:

photo (1)

The list of what’s included is long, but it’ll give you an idea of just how fabulous this kit is!

  • Nail polish in Marina Blue
  • Nail polish in Bubblegum
  • Nail polish in The Grass Is Greener
  • The 2-in-1 base + top coat
  • Nail striper in Eggshell
  • See You In The Hamptons! nail wraps (set of 14)
  • Garden Party Princess nail wraps (set of 14)
  • One pot of Girl Meets Boy nail beads
  • Nail art color wheel
  • Double-sided dotting tool
  • Mini scissors
  • Mini tweezers
  • Mini rhinestones picker
  • Mini nail file
  • Sheet of French manicure stickers
  • Toothpicks

Are you amazed yet? Everything you need to complete a pretty & preppy nail design is included in this nail art kit! I wanted my mani to have a pop of color with a hint of an accent, so I pulled out the nail polish in Bubblegum, the nail striper in Eggshell and two nail wraps in See You In The Hamptons! I applied the nail wraps to my ring fingers and applied two coats of Bubblegum to each of the other nails. After the coats dried, I used the nail striper to create a single line down the center of each nail– save for the thumb, where I created a V with the striper.

photo 2

photo 1

photo 4

photo 5

photo

It was so effortless to pull off this look! I’m so excited to create even more designs with the items provided in the nail art kit– I’ll keep you updated. In the meantime, if you’re interested in checking out the four other themed nail art kits and ordering your own, you can visit Shine & Sheen’s shop here. Originally $35 per kit, you can order a kit for the special price of $30 from now until the end of April!

2K Giveaway Winner

The giveaway that I hosted on Rafflecopter for reaching 2,000 followers on my Facebook page has ended, and a winner has been randomly selected!

Congratulations to Jacqui, from Craftynail! She just won a package of nail goodies, including a bottle of Seche Vite Dry Fast Top Coat, four mini bottles of the new Sheer Tints by OPI, a bottle of the Gwen Stefani Signature Shade ‘Over & Over-A-Gwen’ from OPI and a package of OPI Pure Lacquer Nail Apps!

photo (1)

Thank you so much to everyone who helped make this giveaway happen by being a Facebook fan and who participated in this giveaway :) There will most definitely be more opportunities for giveaways in the future, so be on the look out!